Your Guide on How to Grow Potatoes
The Fool-Proof Way
How To Grow Potatoes In A Small Space
Learning how to grow potatoes is worth taking the time to do, don't miss out on the satisfaction and BIG flavours of freshly harvested homegrown potatoes - you wont be disappointed.
This vegetable is now so common-place, with many more varieties being added over the years, it is difficult to believe it has been with us for only a few hundred years.
The potato has been grown in South America for 7000 years and was brought over to Europe in the 16th century by Spanish explorers. It was not until the 18th century that it began to be accepted as a nutritious staple food item and people began to learn how to grow potatoes.
The humble potato has had to battle against many prejudices over the years - it was not eaten by some because it wasn't mentioned in the Bible, others blamed potatoes for causing leprosy and tuberculosis. The English even thought it led to lust, currently many blame this vegetable for causing obesity.
It is hard to imagine a world that is no longer growing potatoes but fortunately families the world over are still desiring to know how to grow potatoes for themselves in little plots of land of their own and mostly without chemicals.
The only question you need to ask yourself when deciding on how to grow potatoes is, "which type should I grow." The choice is between 'Earlies' and 'Maincrops'. Earlies will provide new potatoes in summer and Maincrop varieties will provide tubers for storage during the winter months.
A good rule-of-thumb, if space is limited plant the Earlies variety of potato for summer eating and where you have plenty of space then grow Earlies and Maincrop varieties for summer eating and winter storage.
Sometimes, knowing when to make compromises is all part of the process of learning how to grow potatoes - or any vegetable... in order to get the best from what ground you have.
How to Grow Potatoes - Soil Details
Choose a sunny position with as little shade as possible and is free from frost pockets.
Potatoes can be grown in virtually all soil types. Dig in plenty of well rotted compost or manure in the autumn if none has been added for a previous crop. This will lighten heavy soils and give body to lighter ones helping to prevent the leaching of nutrients.
Rake in a general fertilizer 2 weeks before planting potatoes. Do not add lime - growing potatoes like a soil pH of just under 6... slightly acidic.
Experienced gardeners who know how to grow potatoes don't plant them in the same ground in successive years but leave 2-3 seasons before planting potatoes again. This stops the build-up of pests and diseases which can affect the crop badly. This also applies to growing potatoes where tomatoes have been planted - the potato belongs to the same family.
How to Grow Potatoes - Chitting
Before planting your potatoes - 'chit' them - see the photo below this simple little tip on how to grow potatoes means you get an earlier crop harvested. It's a simple process of allowing shoots to grow from the 'rose' end where the most 'eyes' are situated... usually the widest end - the seed potatoes need to be about the size of a hens egg.
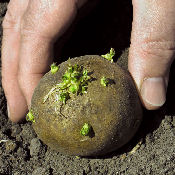
The eyes being the point where the shoots will emerge. This is how to grow potatoes to effectively add a few weeks to the growing season and is vital for Early potatoes and will benefit Maincrop potatoes.
Set out the potato tubers in egg trays or, if you have a large number, into shallow boxes with about 25mm(1") of dry peat in the base - rose end pointing upwards.
Don't worry if you set them out wrong way up and the shoots look a bit distorted and weak - just rub off the shoots with your finger and place them back again the correct way up, and these vegetables will sprout again. Research has shown that the sprouts can be removed several times and the sprouts will grow back.
Carrying out this process means you will need to buy your seed potatoes early - 6 weeks before planting time. Place the boxes in a light (not sunny) but frost-free room.
The room should not be warm as your aim is to grow sturdy shoots about 25mm(1") long and not weak, spindly growth. Once your potatoes have chitted and are ready for planting do not remove any of these sprouted shoots.
How to Grow Potatoes - Planting Out - Under Glass
For the more impatient amongst us who have a greenhouse - that means me - try planting a few Earlies that can be harvested much sooner than the outside crop.
Plant three potatoes to a 25cm(10") pot filled with potting compost in late January or early February if there is some heat in the greenhouse, or late February in a cold greenhouse. By the middle of April the young potatoes should be ready for eating - during May for those in an unheated greenhouse.
How to Grow Potatoes - Planting Out - Earlies and Maincrop
The usual method of planting potatoes is to dig a V-shaped trench or drill about 13cm(5") deep in your prepared seed bed. Alternatively if the soil is reasonably light it may save you time to make a hole with a dibber or some such tool and carefully drop the potato in.
Plant Early potatoes in late March - two weeks earlier in southern areas of the UK and a couple of weeks later in northern areas. Plant maincrop varieties in mid to late April.
For Early varieties the drills need to be 60cm(24") apart and for Maincrop varieties 75cm(30") apart - they make more top and root growth. Along the drills, Early potatoes are spaced 30cm(12") apart and maincrop 38cm(15") apart.
Carefully plant the seed potatoes with the rose-end uppermost - rejecting and destroying any diseased vegetables. After planting out the potatoes along the drill, cover each one with a handful of peat or fine soil to protect the shoots - they snap off easily - as you fill in the drill or hole. The seed potatoes should end up with a covering of approximately 8cm(3") of soil.
Don't despair. . . learning to grow potatoes will follow naturally from actual experience in the field (pun intended). Besides, you're not alone. I'm here to serve as your guide for every step along the path to a delicious vegetable garden.
How to Grow Potatoes - Some Potato Varieties
Well... you're getting to know how to grow potatoes but maybe you're not sure which variety to grow. I have listed some examples in a table below just click on a potato variety and a page will open with a photo and description.
When finished click on a link at the bottom of that page to return here. You can grow any or all of them - just follow my instructions on this page and you will have spuds-to-go.
|
Earlies | |
|
2nd Earlies | |
|
Maincrop | |
|
Salad |
How to Grow Potatoes - Caring For Your Plants
If shoots begin to push through the soil during late frosts, draw some soil up over them and this will protect against frost damage.
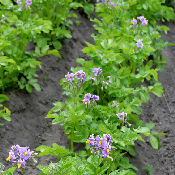
When the plant stems (haulm) are about 20-25cm(8"-10") high begin earthing-up. Start by removing any weeds from between the rows and break up the soil with a fork.
Using a draw hoe, pull the soil towards the plants from each side of the row creating a flat-topped ridge about 15cm(6") high. Do this either a little at a time or all at once - it really doesn't make any difference - it's your call.
For the best results, those who know how to grow potatoes water liberally in dry weather. This is especially important when the potato tubers have started to form to ensure good harvests.
How to Grow Potatoes - Pest Control
It's understandable that the humble potato may develop a 'persecution complex' as there are numerous pests and diseases that can attack and reduce yields.
But only five may prove to be a serious threat. You should have relatively few problems if you purchase certified virus free seed potatoes. It is important though that in knowing how to grow potatoes properly... know your enemy.
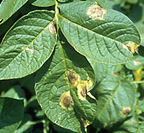
Potato Blight - this is the most serious of the potato diseases you must be aware of when learning how to grow potatoes. It can destroy all this vegetable's foliage during August if the season is a wet one.
The first signs are dark-brown patches on the leaves, the haulm dies and affected tubers later rot - see photos left and below. In damp weather these spots will have a white mould fringe on the underside of the leaves. Be vigilant and watch out for the signs - July and August are the main months.
There is no cure... so take precautions and:
ALWAYS... use certified virus free seed potatoes bought from reputable suppliers. Knowing how to grow potatoes is also knowing your soil and its weaker areas - you can then choose to grow potatoes that have resistances to various pests and diseases. That will come with time and experience.
BURN... or dispose of, away from your plot, infected foliage and especially tubers - these will be the source of next years infection.
DO NOT... grow potatoes in the same ground two years running - this prevents pest and disease build-up.

IF YOU... choose to, spray with a fungicide as an insurance from early July until middle of September if the weather is damp. Visit your local garden centre or nursery and get their advice on what to use.
IF YOU... discover an infestation then cut down the haulm to about 5cm(2") above the ground before the fungus has reached the tubers. The tubers will not develop as well without the haulm but they will continue to grow for a few weeks and you will be able to harvest something.
Common Scab - This disease is only skin deep and does not affect the eating quality. Severest on light soils in dry conditions.
Again there is no treatment for this disease but you can help prevent it by growing a resistant variety - Wilja works well. Also dig in plenty of well rotted compost or manure and don't lime before planting.
Potato Cyst Eelworm - The plant becomes weak and stunted, the lower leaves wither away and the rest wilts during the day. Only very small tubers are produced... a little larger than a pea. Not much return for the time you've taken to learn how to grow potatoes, so be vigilant.
The eggs can persist in the soil for ten years so for heavily infested ground potato production has to stop for a number of years. When the eggs hatch the grub burrows into the potato's roots where they form tiny cysts containing hundreds of eggs.
There is no treatment - destroy infected plants and tubers. To help prevent a build of this pest in the soil... yep you guessed it - practise crop rotation. The best defence against this enemy is a fertile soil and grow a resistant variety.
Wireworm - are yellow, tough-skinned grubs of the click beetle which bore into the tubers leaving them riddled with narrow tunnels. They are encountered most in new vegetable patches that were once grassland.
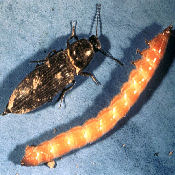
They may be trouble for a couple of years when you dig up a garden lawn for use as a vegetable garden. See photo left.
There is no treatment but a little trick that might be worth trying is to make a millipede trap.
Punch holes - bottom and sides - in old tin cans and fit them with wire handles. Fill the cans with potato peelings and bury them around the growing potatoes with the handles above the ground. Lift the cans every few days and discard its contents.
Unless you find some really nasty pests, discard them somewhere safely away from your plot rather than crunch em - no, not in your neighbours plot ;0)
Slugs - Maincrop potatoes grown in heavy soil can be badly damaged - attacks usually begin August. See planting green beans (pole or runner beans) for ways to combat slug attacks - a new page will open so if you have a 'pop-up' page blocker allow it to open this page.
How to Grow Potatoes - Harvesting
The Early varieties will be ready 10 to 12 weeks after planting. When the flowers are fully open, dig up a root to check if the potatoes are large enough to cook (size of a hens egg)... if not wait another week or so.
Don't harvest more than you need at any one go - left in the ground they will continue to grow. Again don't become too obsessed by trying to guage the exact moment for lifting - knowledge and learning how to grow potatoes come best with experience - just do it and adjust from experience... you will succeed!
Potatoes for storing will come from the Maincrop varieties. Let the haulm die down then cut it off and remove from the bed. Wait a further 7-10 days and on a dry sunny day if possible, lift the tubers by working along the rows from the sides. Push a fork into the ground away from the ridge and gently lift under the root to loosen the soil.
Continue by removing the soil around the tubers by hand. Let the tubers lie on the ground to dry for a few hours. Remove any diseased or damaged tubers as these will only rot when being stored. Use the smallest and damaged potatoes for immediate use.
Remove all tubers from the soil no matter how small. Left in the ground they will grow the following year, become a nuisance - these are called 'volunteers' and (no, I don't know why... sorry) help perpetuate the pests and diseases that we are trying to eradicate. These little snippets of information are usefull when when building up your knowledge on how to grow potatoes.
An important part of being informed on how to grow potatoes is knowing how to store your vegetables properly. Store your potatoes in boxes or sacks in a dark frost free place.
Don't have it too warm either as the potatoes will begin to sprout. Make sure light is excluded as the potatoes can turn green and become dangerous to eat. Check them periodically and if you find any that are rotting, remove them.
That's how to grow potatoes. I hope you have great success and as a lover of baked and roasted potatoes the best ever spud for these is Wilja... in my humble opinion.


